Building a website using Yecco Docs and Eleventy (11ty)
Premise
This tutorial aims to help understand the basic concepts of Yecco Docs and how you can utilize it's intuitive document modelling system to quickly build a CMS that's tailor made for your website.
This also assumes you have a copy of Yecco Docs running locally or running in the cloud.
You can find the full source code for the project here: https://gitlab.com/yecco-docs/yecco-docs-developer-tutorial
Contents
- Setting up the frontend repository
- Building a simple landing page with HTML
- Modelling the document type for the landing page in Yecco Docs
- Creating a document for our landingpage
- Create an API key for retrieving our document
- Wiring the frontend repository to use the content from Yecco Docs
- Implement our data into the landing page template
- Create a custom field to handle image uploading using Imagekit.io
- Add the image to the document type
- Render our uploaded image
1. Setting up the frontend repository
Eleventy (11ty) is a brilliantly simple framework to create statically generated sites (SSG) that focusses on getting content out there, rather than configuring lots of stuff, much like Yecco Docs. Setting up a 11ty repository from scratch is relatively easy and is well documented on the official 11ty website. In order to save some time and focus on the implementation I'm using a skeleton project that has 11ty, as well as Pico CSS and some other utilities, already set-up, so I can just clone the repository and start on my project immediately.
You can find the repository here on Gitlab or clone it over https using the following command:
git clone https://gitlab.com/yecco-docs/yecco-docs-skeleton-frontend
2. Building a simple landing page with HTML
We'll build a simple landing page that consists of the following elements:
- A hero header, with a nice big image, a title and juicy tagline
- Some text that we can format using Markdown
- A footer with a copyright notice
Now obviously you can expand on this however you see fit, but we really just want to focus on getting something out there, quickly!
Let's start building. Open the file src/views/index.njk to start editing the default page immediately.
The hero header
For the hero header we're going to use a simple html layout to display the image, title and tagline. We'll use the following html snippet:
<section>
    <header>
        <div class="image">
            <img width="1280" height="720" src="https://placehold.co/1280x720" alt="background image"/>
        </div>
        <div class="overlay"></div>
        <div class="content">
            <h1>Our title</h1>
            <h2>Our juicy tagline explaining the value of our website</h2>
        </div>
    </header>
</section>
We'll use the following style, by opening src/sass/style.scss and creating an include for the header component, by writing this line at the very bottom:
@import "components/headers";
Next we'll create the header component file src/sass/components/_header.scss. Open it and add the following styling, to create a nice header.
header {
  display: grid;
  place-content: center;

  > div {
    grid-area: 1 / 1;
    position: relative;
  }

  .content {
    align-content: end;
    text-align: center;

    h1 {
      font-size: 3rem;
    }
  }

  .overlay {
    background: linear-gradient(0deg, rgba(255, 255, 255, 0.75) 0%, rgba(255, 255, 255, 0.5) 50%);

    @media screen and (prefers-color-scheme: dark) {
      background: linear-gradient(0deg, rgba(0, 0, 0, 0.75) 0%, rgba(0, 0, 0, 0.5) 50%);
    }
  }

  .image {
    max-height: 80vh;

    img {
      width: 100vw;
      height: 100%;
      object-fit: cover;
    }
  }
}
When you're done you should have something similar to this image: 
The main text
This is the easy part, we'll just add some simple HTML now, that we'll replace with the content from Yecco Docs in the next part.
<section class="container">
    <article>
        <p>Lorem ipsum dolor sit amet, consectetur adipiscing elit. Etiam pulvinar tortor eget ante sagittis suscipit.
            Ut et consequat felis. Interdum et malesuada fames ac ante ipsum primis in faucibus. Vestibulum sit amet
            accumsan nisl, sit amet placerat nulla. Maecenas laoreet purus at diam eleifend, vel ornare massa rhoncus.
            Maecenas lacinia purus vel dictum sodales. Proin ac volutpat ante, sed fermentum mauris.</p>
        <p>Sed facilisis pharetra enim ut consequat. Nullam id lorem consectetur, dapibus ligula quis, consectetur
            metus. Cras pellentesque, nibh a tincidunt imperdiet, velit augue porttitor arcu, vel tempor sem tellus sit
            amet sem. Aenean sagittis venenatis eros, vel mollis velit rutrum quis. Nullam pretium mollis tincidunt. Ut
            massa justo, tempor in nunc id, tincidunt consequat massa. Aliquam erat volutpat. Maecenas ultrices porta
            odio eu aliquet. Sed iaculis maximus metus vehicula imperdiet.</p>
    </article>
</section>
The footer
And finally we'll add a footer containing our copyright notice:
<section>
    <footer class="has-text-centered">
        <p>❤️ Made with love and <a href="https://www.yeccodocs.com/" target="_blank">Yecco Docs</a></p>
    </footer>
</section>
It should look like this: 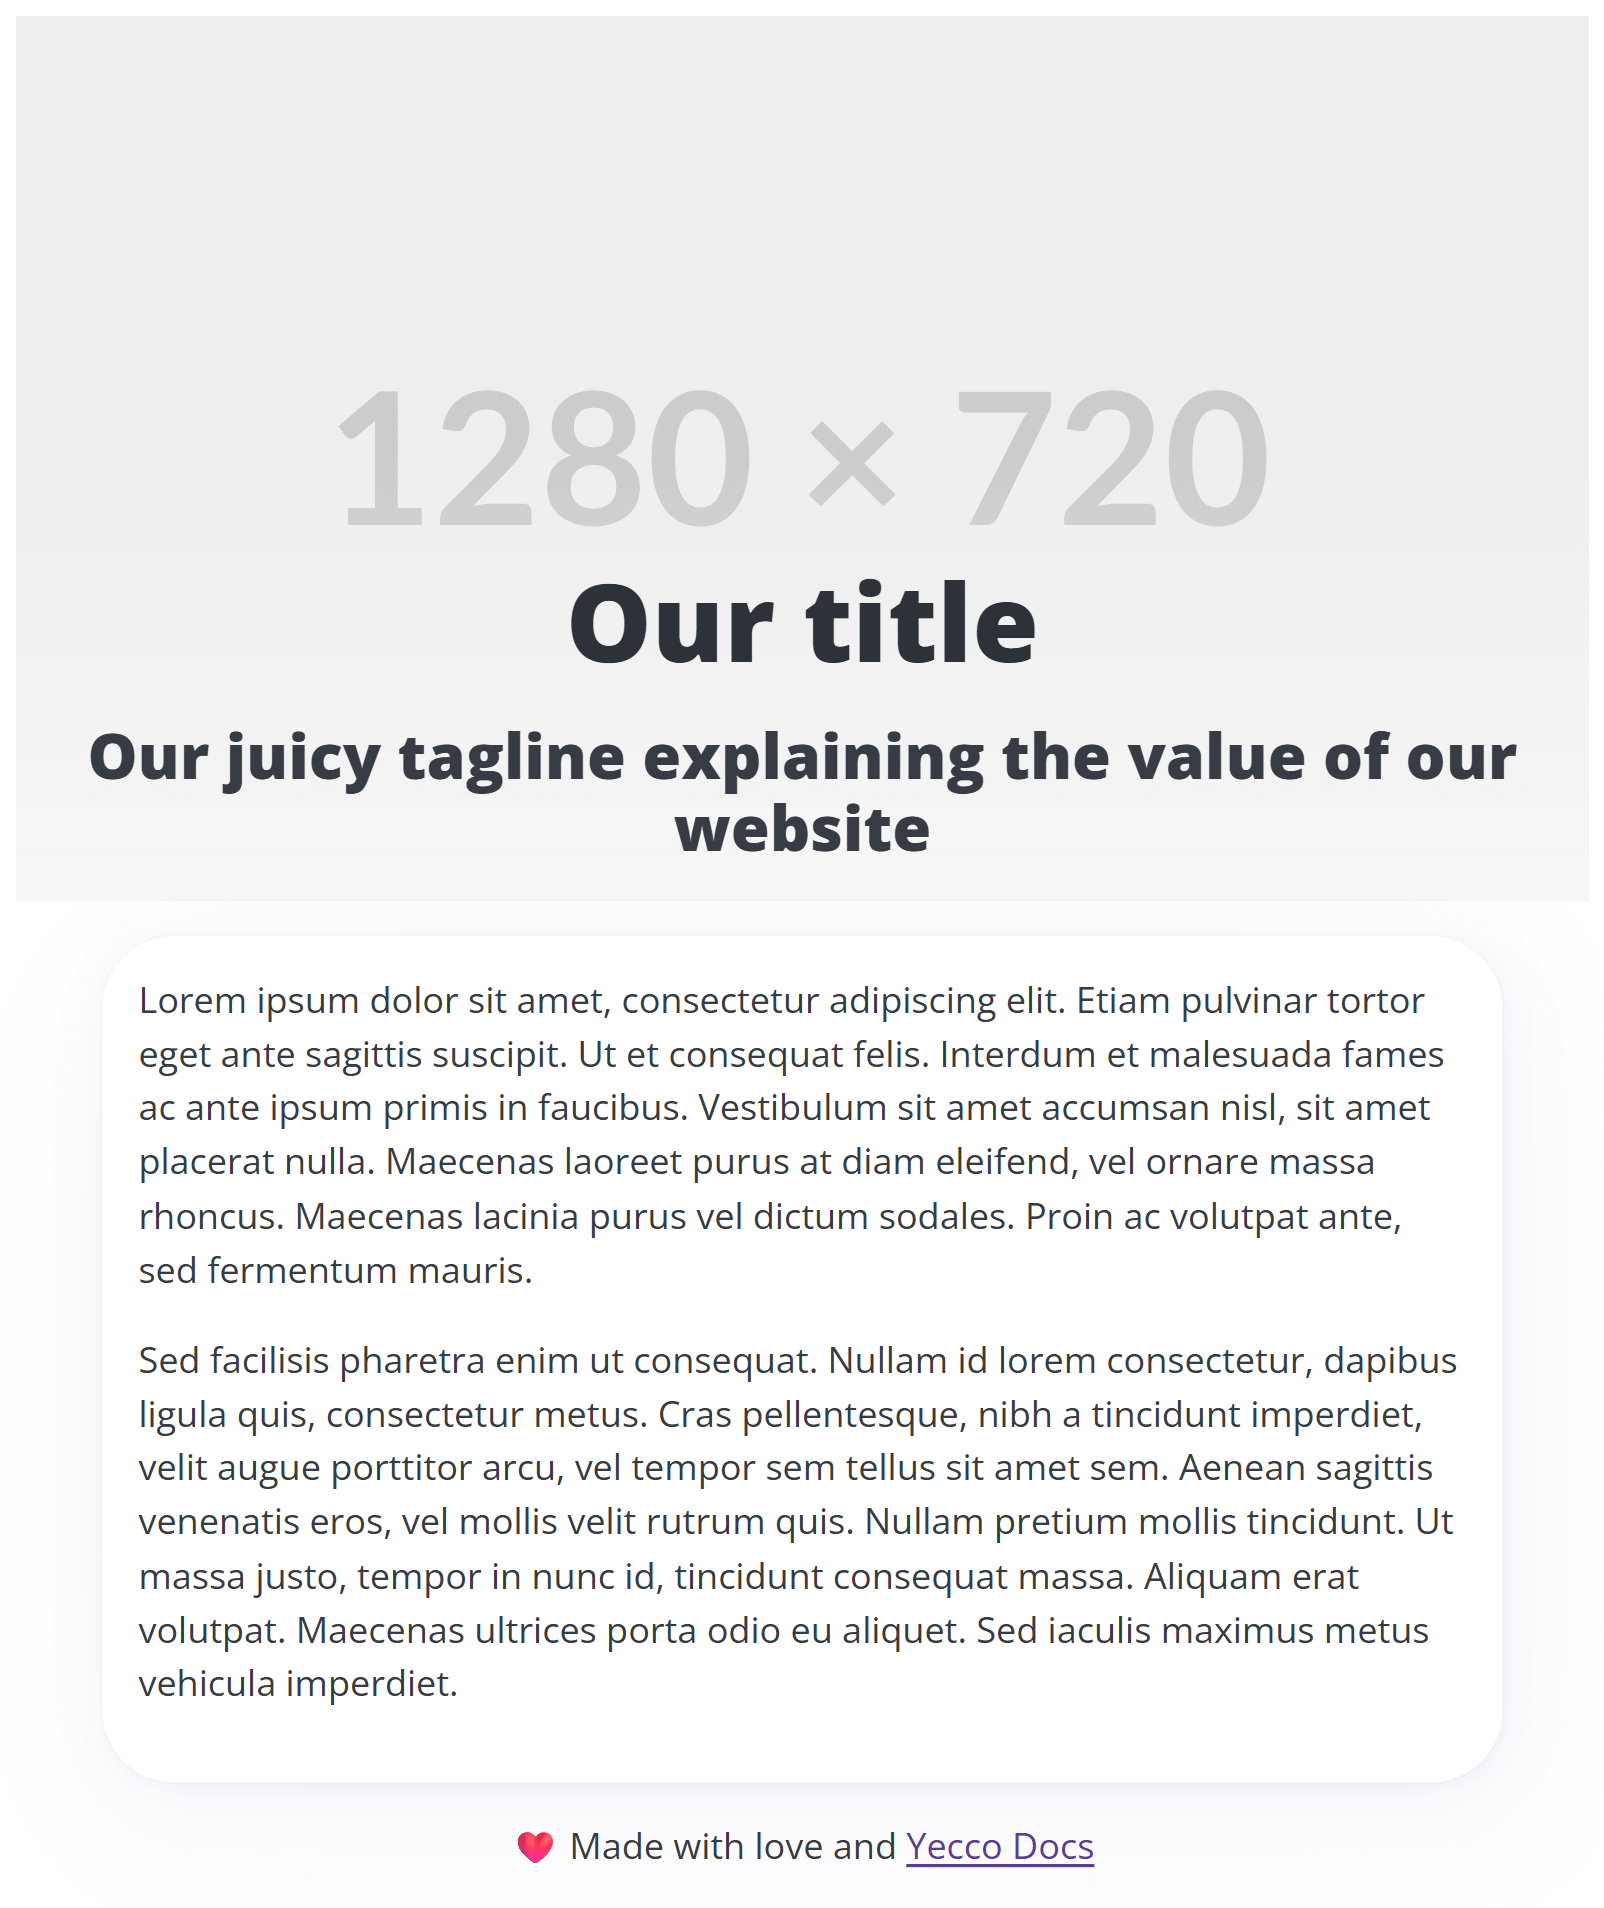
Next we'll start with modelling the document in Yecco Docs, so we can input our content there, so when we want to make changes, we'll no longer need to edit the html anymore.
3. Modelling the document type for the landing page in Yecco Docs
Login in to Yecco Docs. Click the cogwheel (⚙️) to open the dropdown and click Document Types. Document types are the models on which documents are based. So here you define what the documents that your CMS users can edit will look like. Click on ✨ New document type and you'll see the following screen: 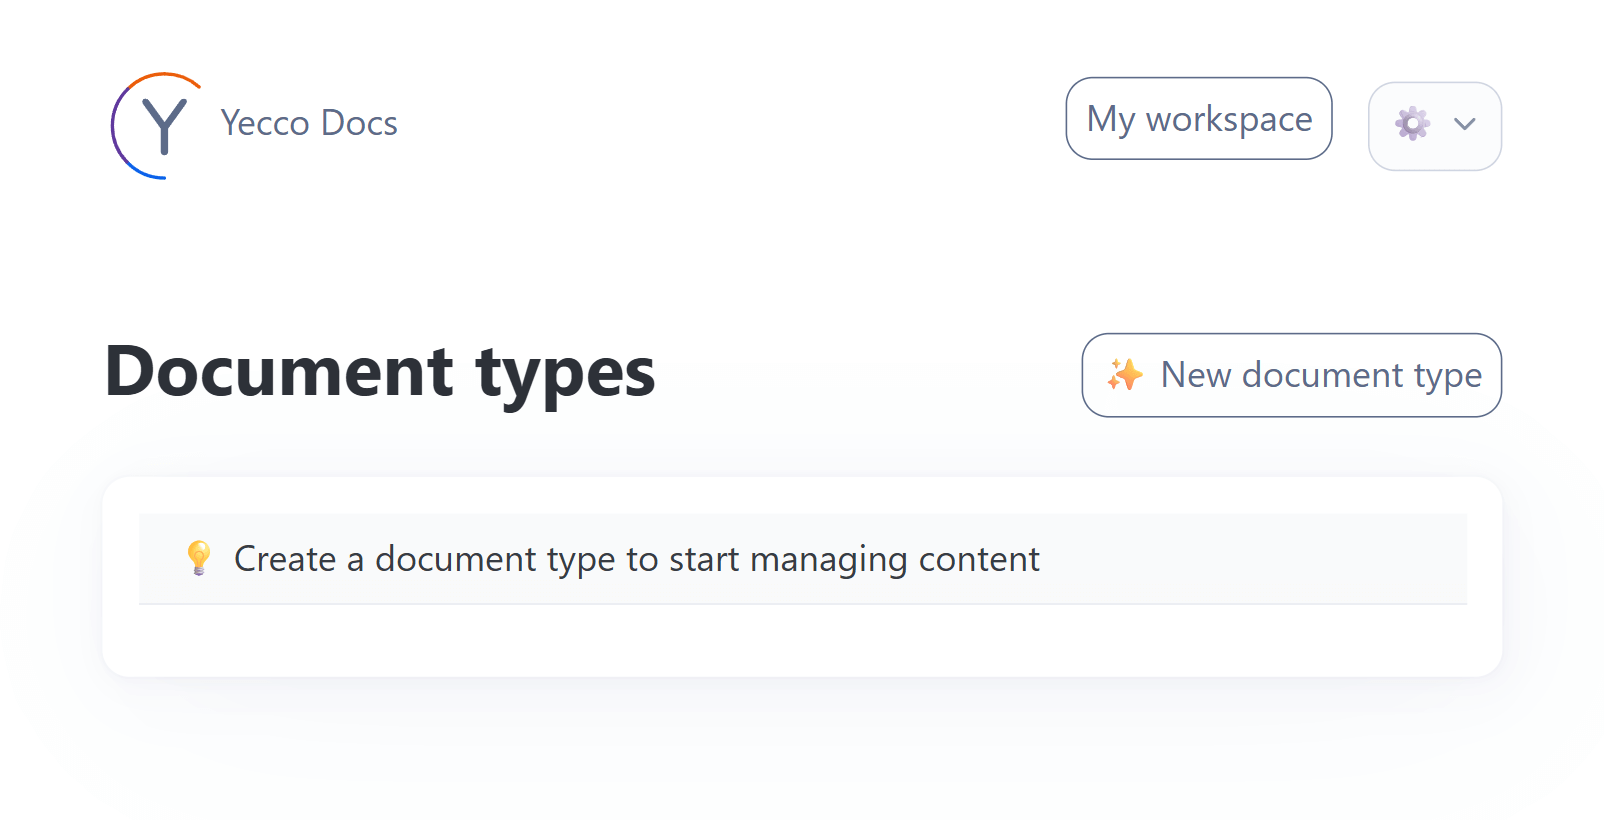 Let's call our document type
 Landingpage. At first we'll start by adding a new field of the type 🔠 String. We'll give this field the name Title. From the dropdown we'll select Single line. This is the template that's used to display this field in the document.
Repeat the same for the fields Tag, Text and Copyright notice. For the Text field, choose Markdown from the template selection dropdown.
You should end up with a document type that looks like this: 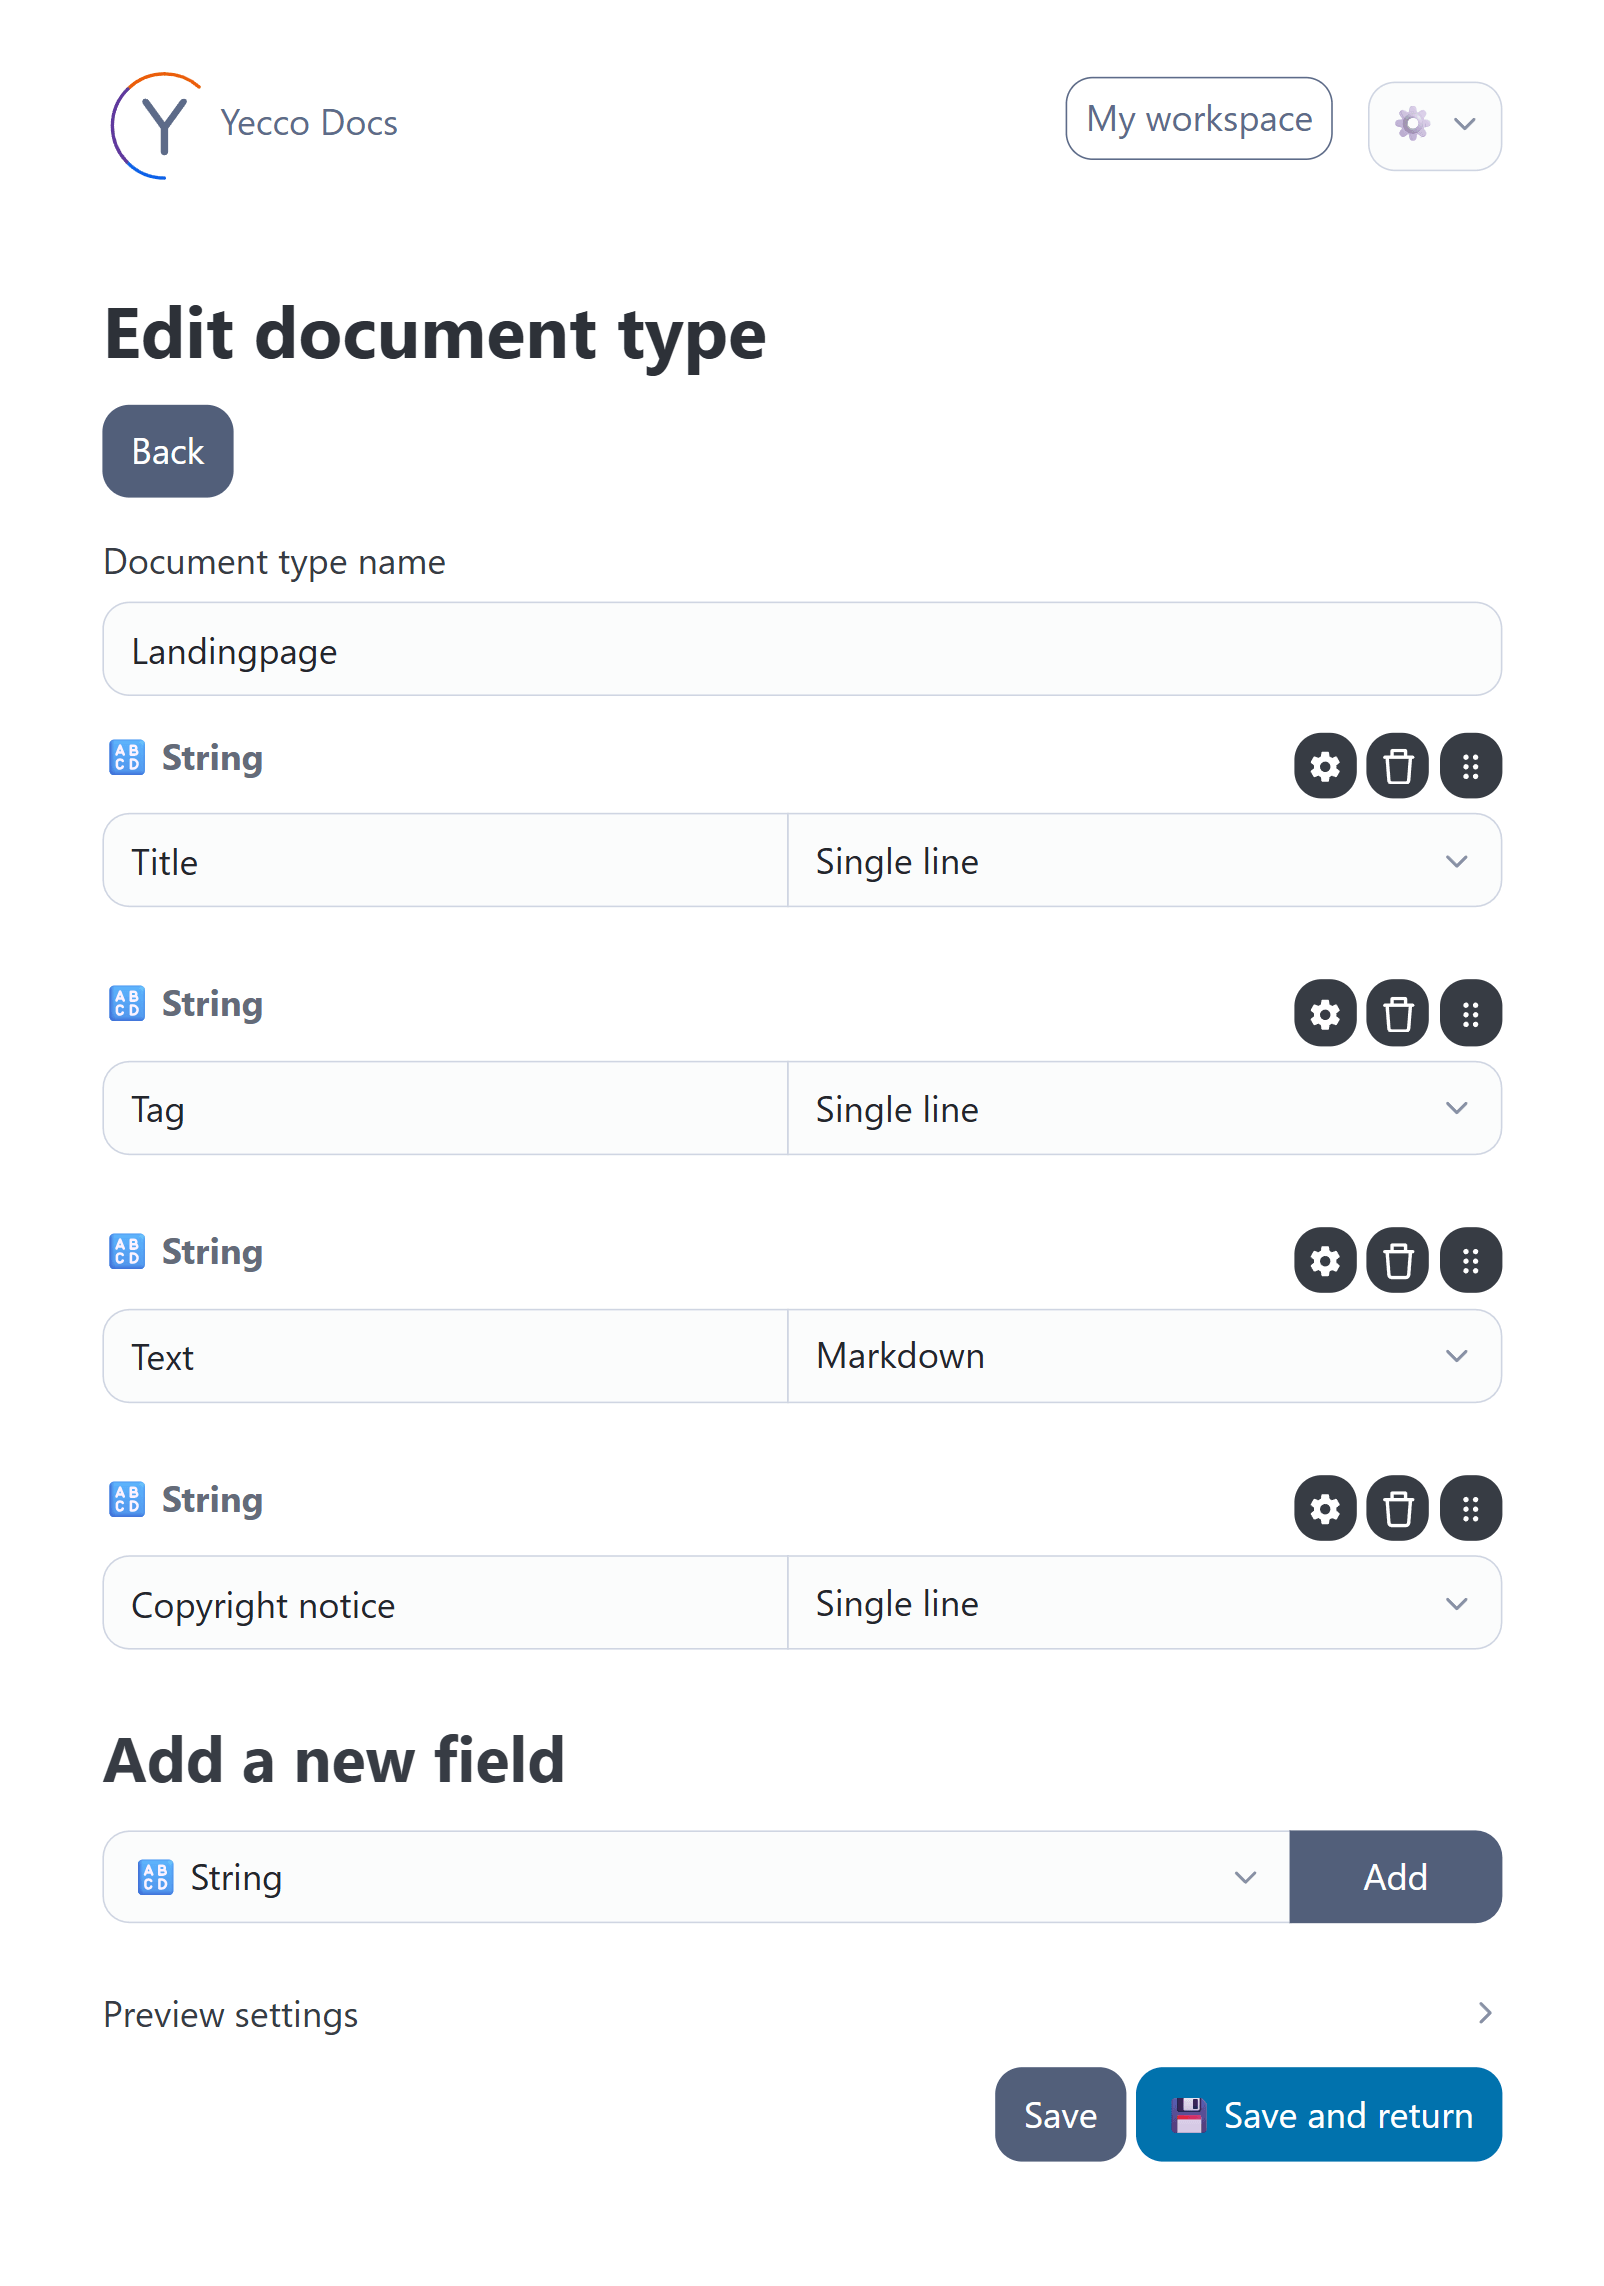
Press 💾 Save and return. Congratulations, you have just modelled your first document type! 🎉
4. Creating a document for our landingpage
Click the cogwheel (⚙️) in the top right corner and click Documents. Now click on New and select Landingpage. You'll be presented with a empty document, where you can fill in the content for your landing page. 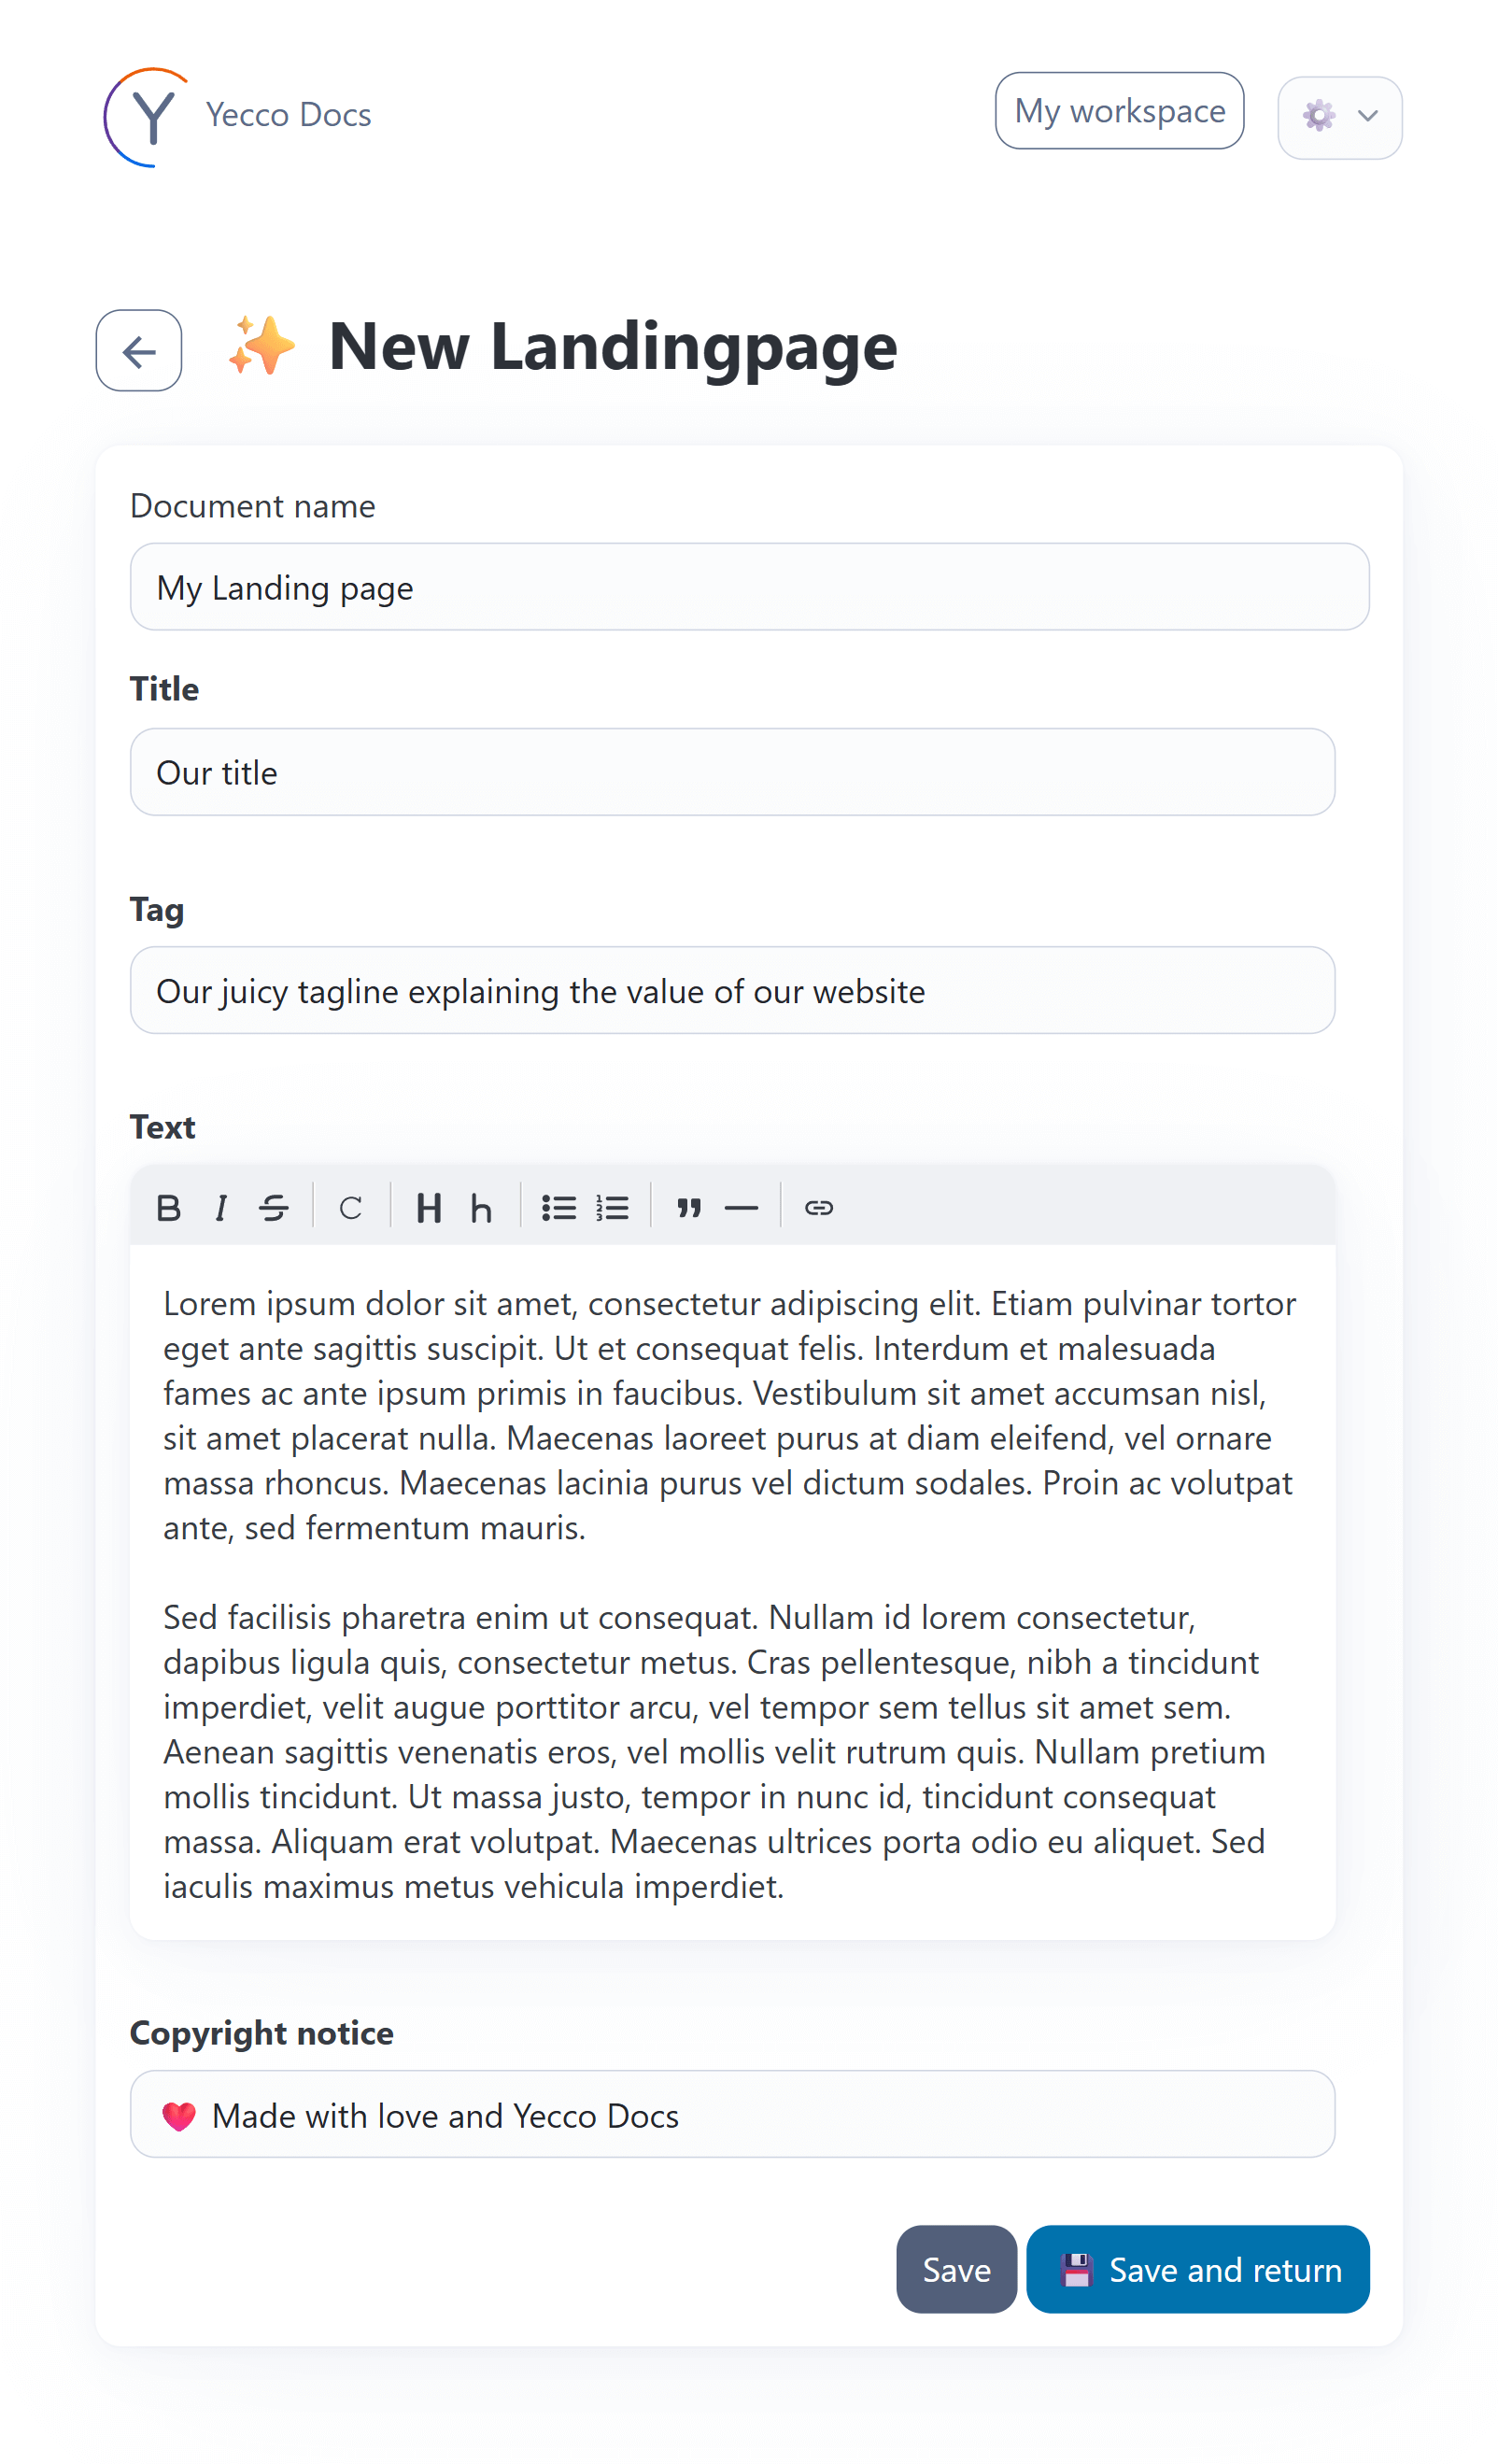
5. Create an API key for retrieving our document
In the top right corner, click the cogwheel (⚙️) and click API keys. Click on ✨ New API key. Give this API key a name and select an expiry date somewhere in the future. Now comes time to select the permissions this API key has. First we're going to select the Preview checkbox. This allows this API key to read our document, even when it's not published. This is not recommended for production use, then instead you'd only use a preview key for development purposes. Fold-out the tab containing your workspace and select the read persmission the document type called Landingpage. This allows the API key we created to retrieve the document we've created for our landingpage.
You should end up with a configuration like this: 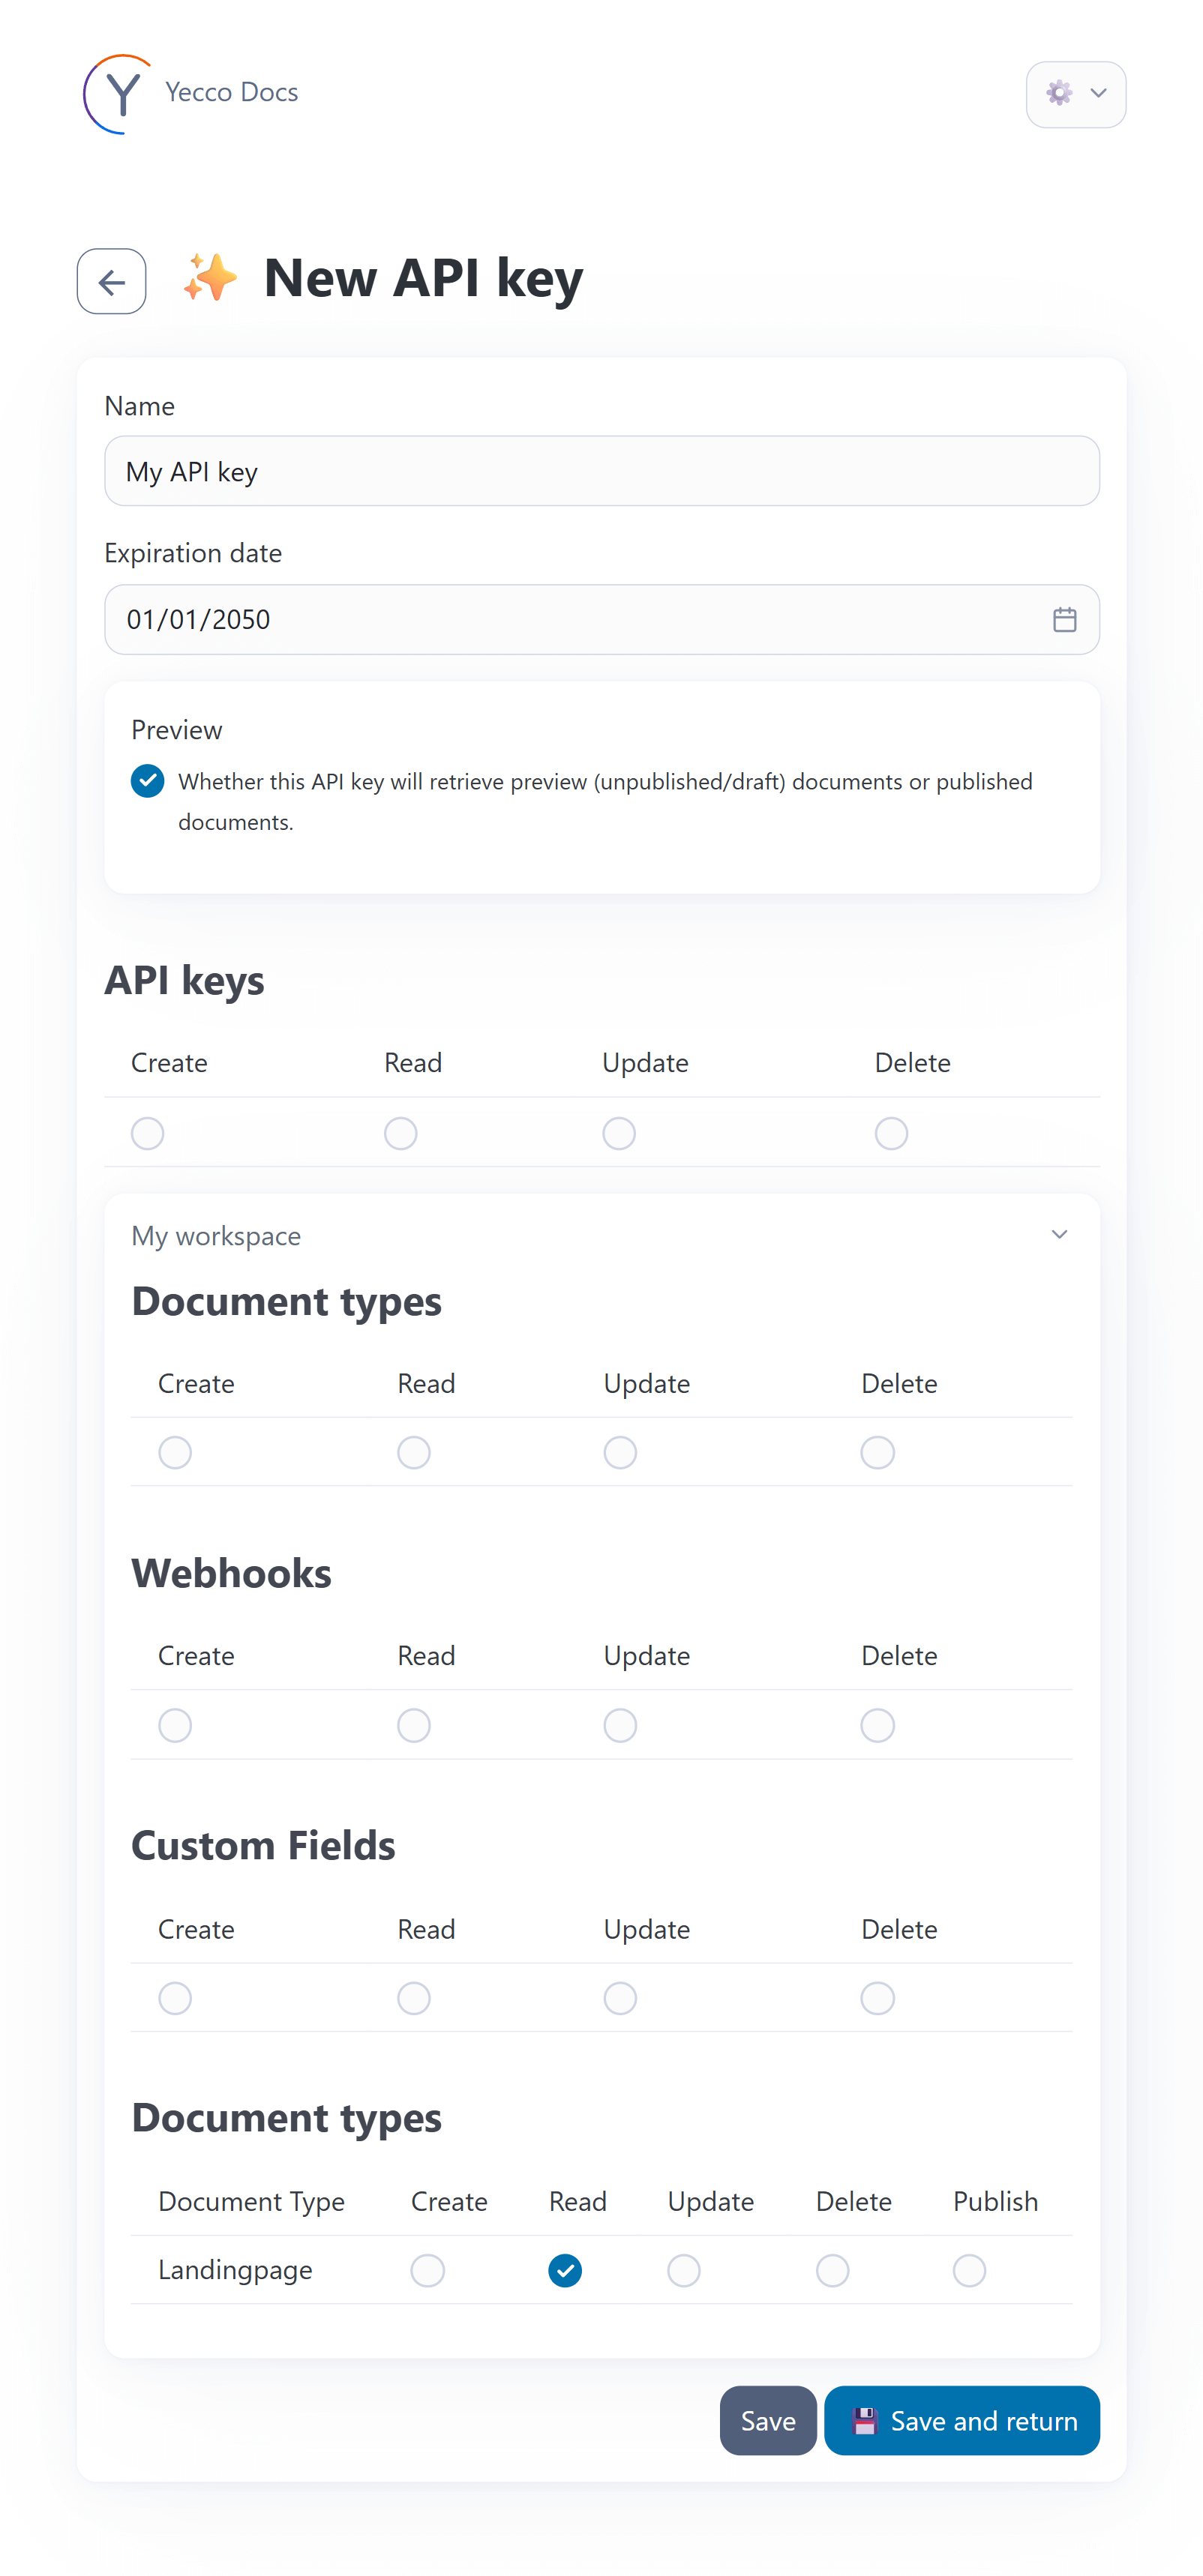
Next, click on Save. Now you'll see there's an API key generated that we'll use to retrieve the document in our website.
6. Wiring the frontend repository to use the content from Yecco Docs
First we're going to set up some environment variables for our project where we'll set the API key and the ID of the document we want to retrieve. To find the ID of your document, open your document and the top right of the screen press the button with the dots and select 💡 Document info. Here you find the ID of the document. 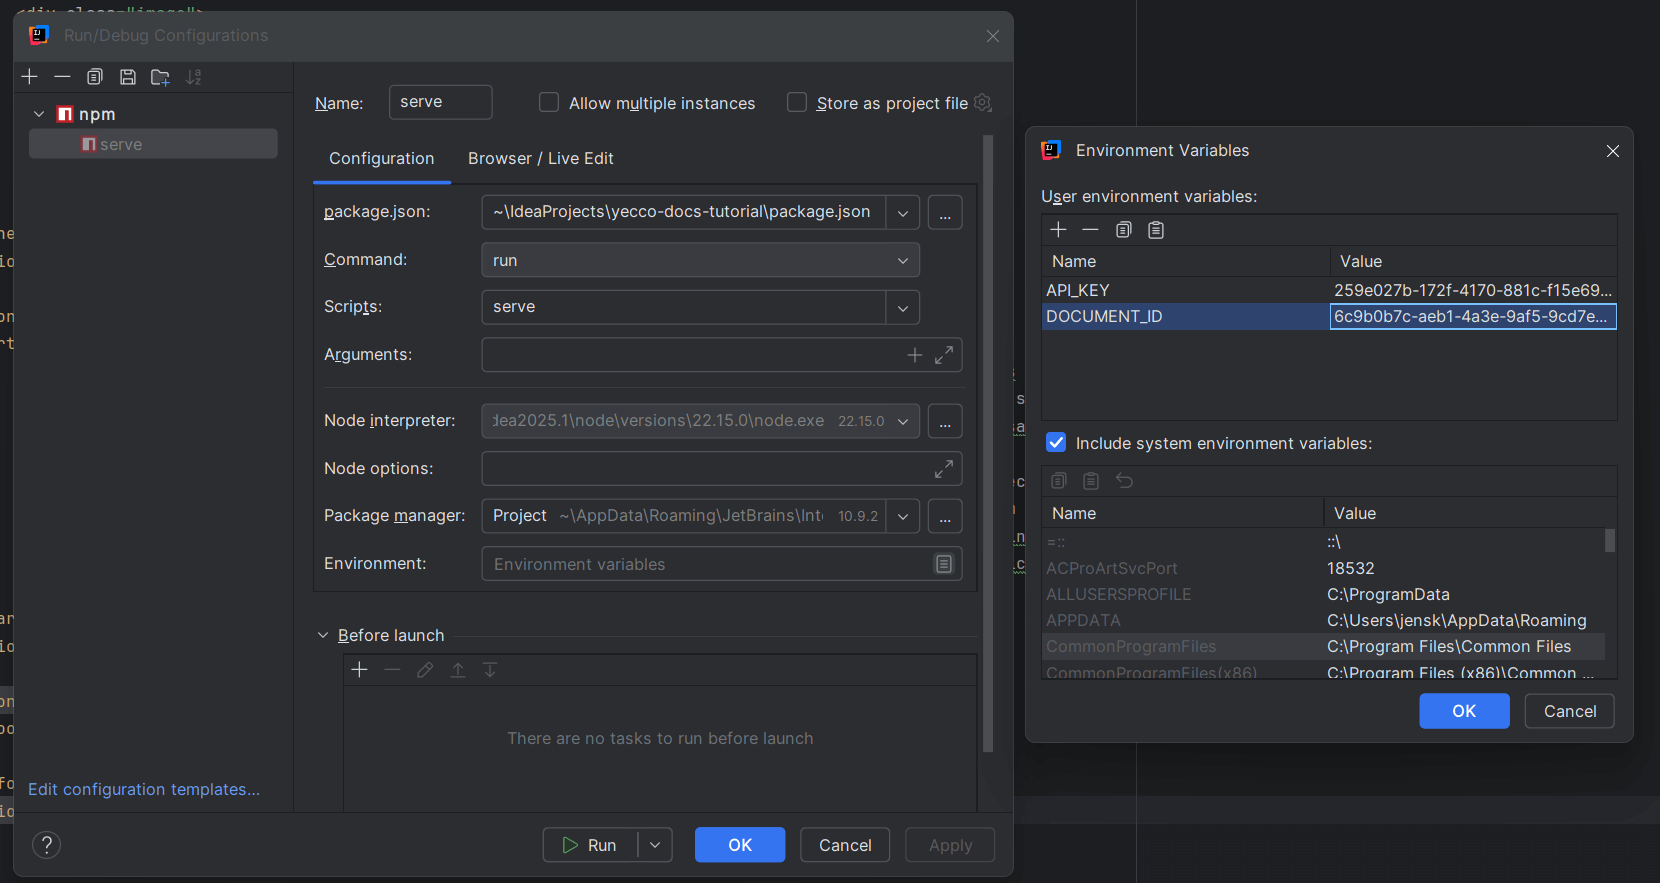
We're using Jetbrains IntelliJ for development, but other IDE's work similarly. We set the following environment variables for our project: API_KEY: <the key we generated> DOCUMENT_ID:<the id of the document we created> 
Next in our project we'll create a data file in src/views/_data called document.js that uses a simple Node.js script to fetch our document:
module.exports = async () => {
    const {API_KEY, DOCUMENT_ID} = process.env;
    const url = `http://localhost:8080/api/documents/${DOCUMENT_ID}`;
    const response = await fetch(url, {
        method: "GET",
        headers: {
            "X-API-KEY": API_KEY,
        }
    });
    return await response.json();
}
This fetches the document from Yecco Docs. In our case we're running Yecco Docs locally (hence the http://localhost:8080/). If you're using the cloud version of Yecco Docs, use either https://cloud.yeccodocs.com/ or the provided url for your private cloud environment. The document is exposed to the template by Eleventy under the variable name document (like the filename). See also their documentation on this principle.
7. Implement our data into the landing page template
Head back to our template in src/view/index.njk. Let's start with our header. In Yecco Docs, all fields by default are represented by an array of values, even if a field only contains a single value, like our title. This is to have a consistent API output. In order to use the data from our document, we adjust the <h1> tag to the following: Old:
<h1>Our title</h1>
New:
<h1></h1>
Do the same for the other fields and you'll end up with the following html:
<section>
    <header>
        <div class="image">
            <img width="1280" height="720" src="https://placehold.co/1280x720" alt="background image"/>
        </div>
        <div class="overlay"></div>
        <div class="content">
            <h1></h1>
            <h2></h2>
        </div>
    </header>
</section>

<section class="container">
    <article>

    </article>
</section>

<section>
    <footer class="has-text-centered">
        <p></p>
    </footer>
</section>
Now if we change the data in our document, save it, then rebuild our frontend, you see the data in your website changes too! That's already pretty much everything you need to start building websites with an integrated CMS! See how easy that was? Now the next part if adding the image. For this we'll need a custom field.
8. Create a custom field to handle image uploading using Imagekit.io
We're going to use Imagekit to handle the hosting of our images. Their CDN, image transformation API and generous free tier make this an excellent choice for getting started. Go to their website and create an account. In the menu go to Developer options and copy your private key (or you can create a new key, just for usage in Yecco Docs. Make sure it has read and write permissions).
Head back to Yecco Docs and click the cogwheel (⚙️) and select Custom Fields. Create a ✨ New custom field. Give it a name and use the urls from the public Yecco Docs plugins:
Display url: https://plugins.yeccodocs.com/imagekit-display/
Picker url:https://plugins.yeccodocs.com/imagekit-picker/
In the settings field, set the following parameters:
{
  "apiKey": "<YOUR_IMAGE_KIT_API_KEY>",
  "multiValue": false
}
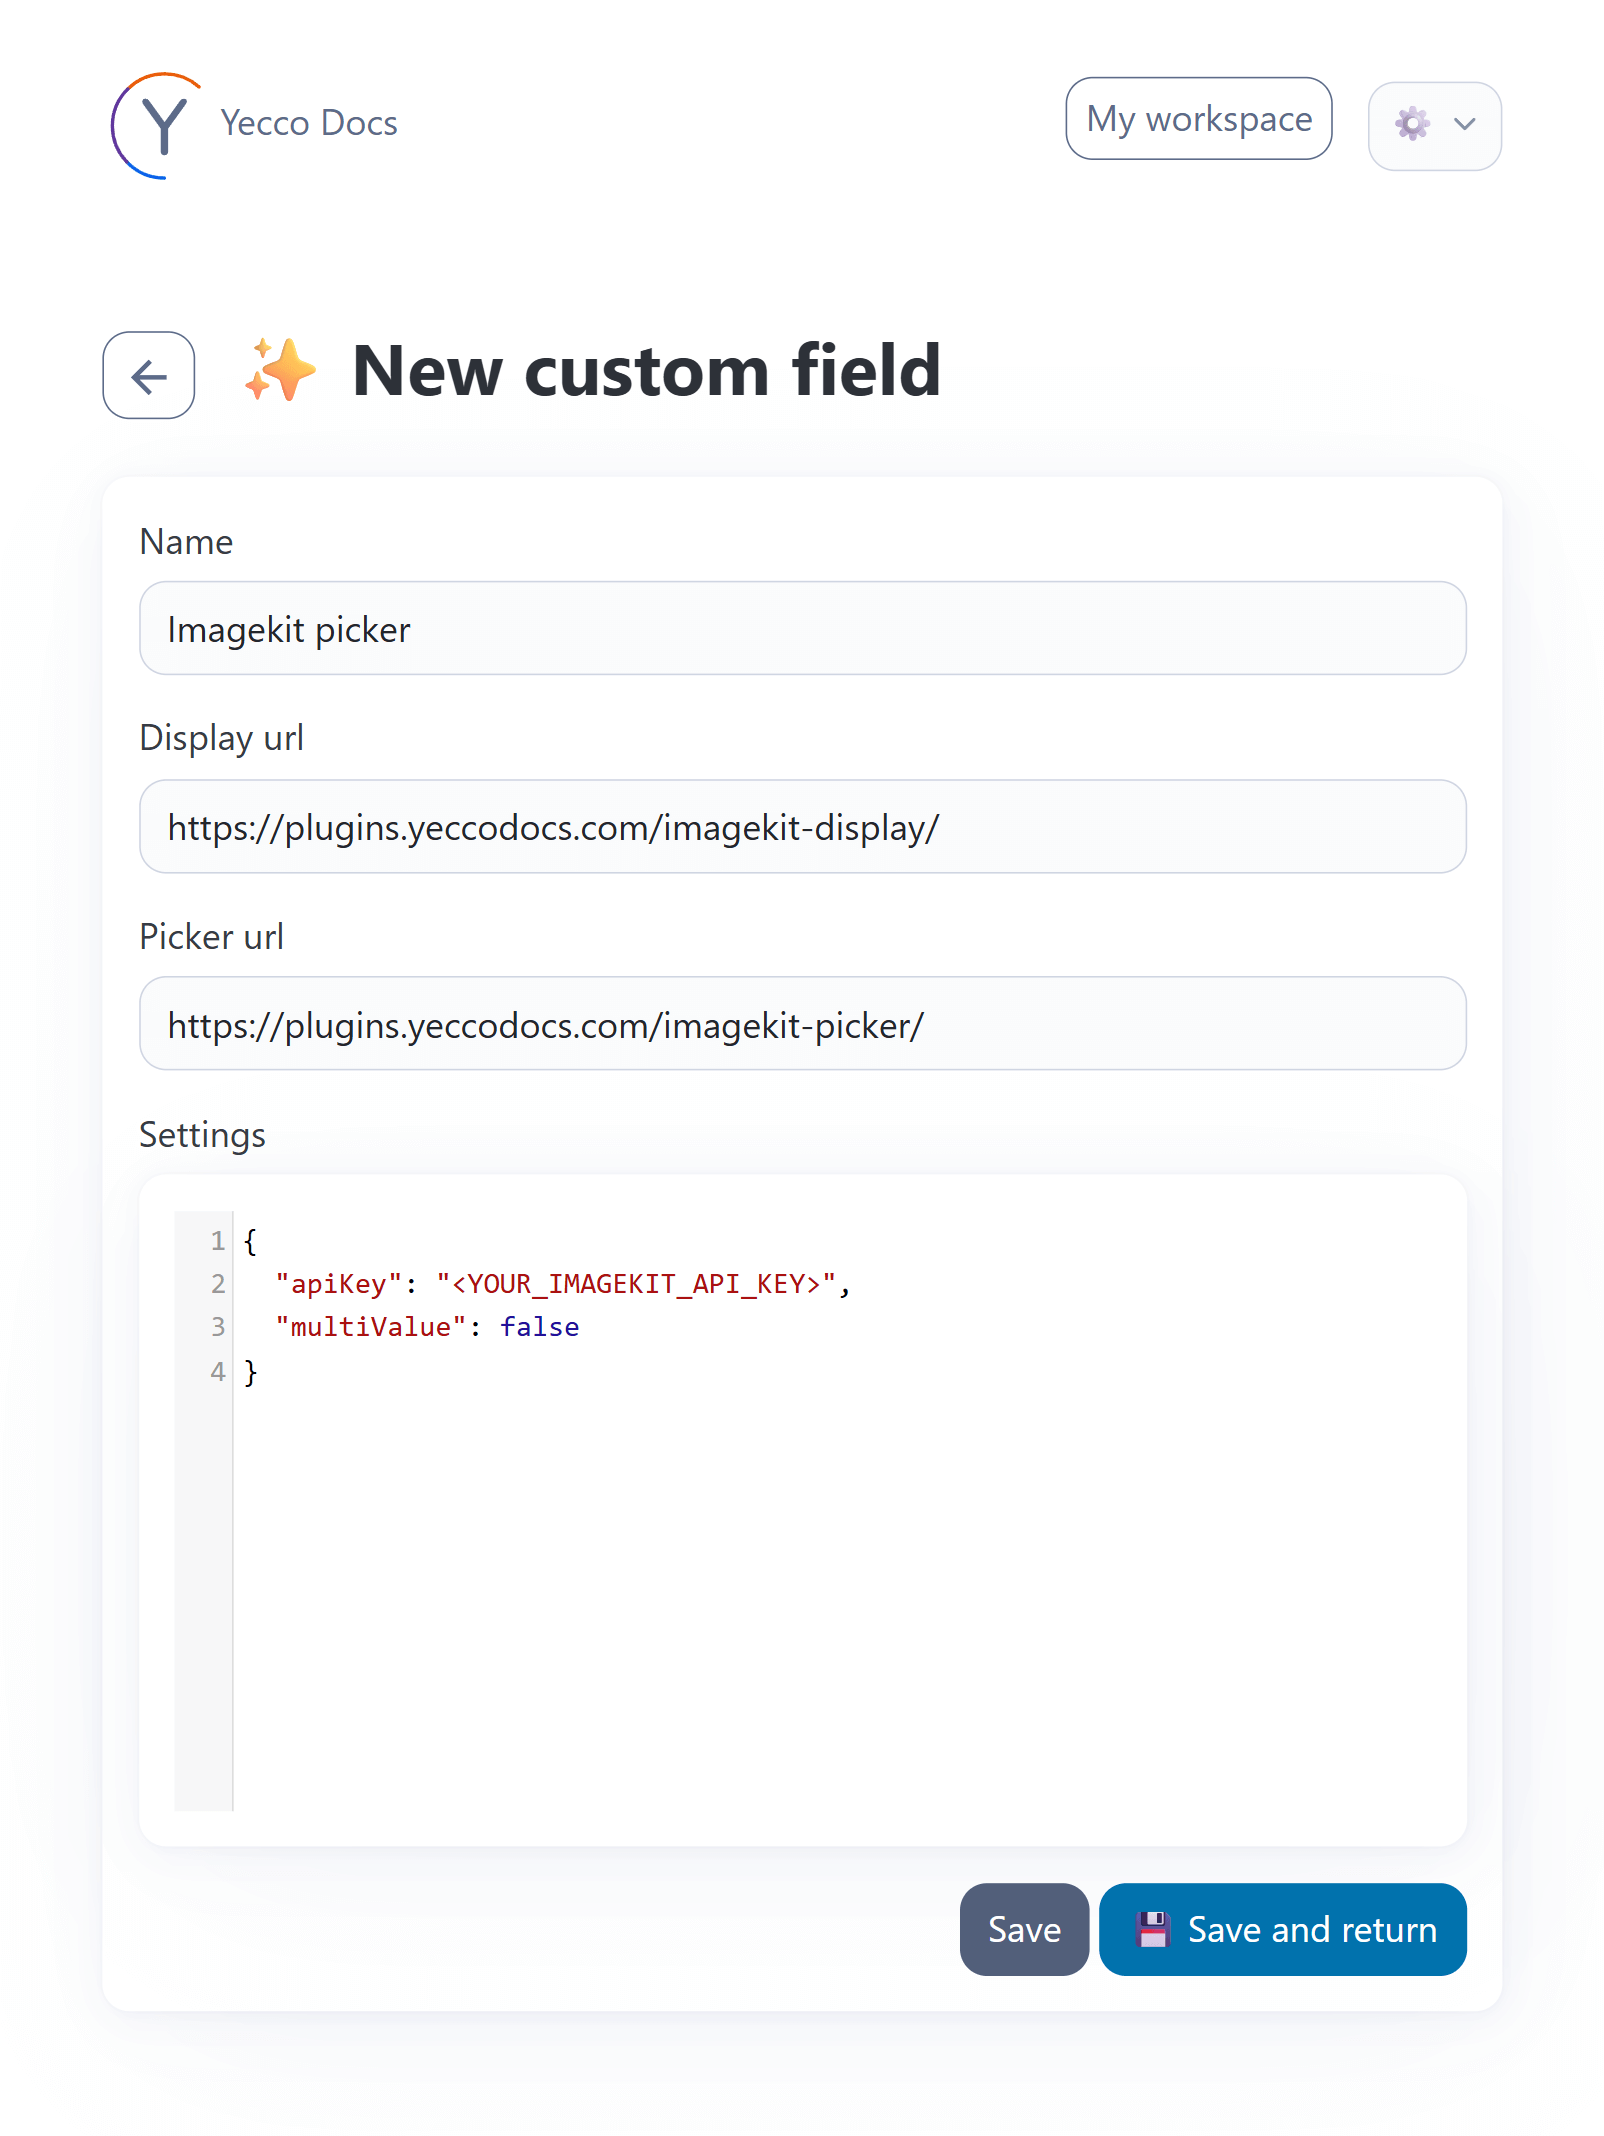 Hit
Hit Save and now and ID field appears. Copy this ID.
9. Add the image to the document type
Go back to your document type, by clicking the cogwheel (⚙️) and selecting Document types. Edit the Landingpage and at the bottom add a new field. This time of the type 👾 Custom Field. Name it Image, then click on the little settings cogwheel (⚙️) for this field. Paste the ID of the custom field here. Save your document type by pressing 💾 Save and return. 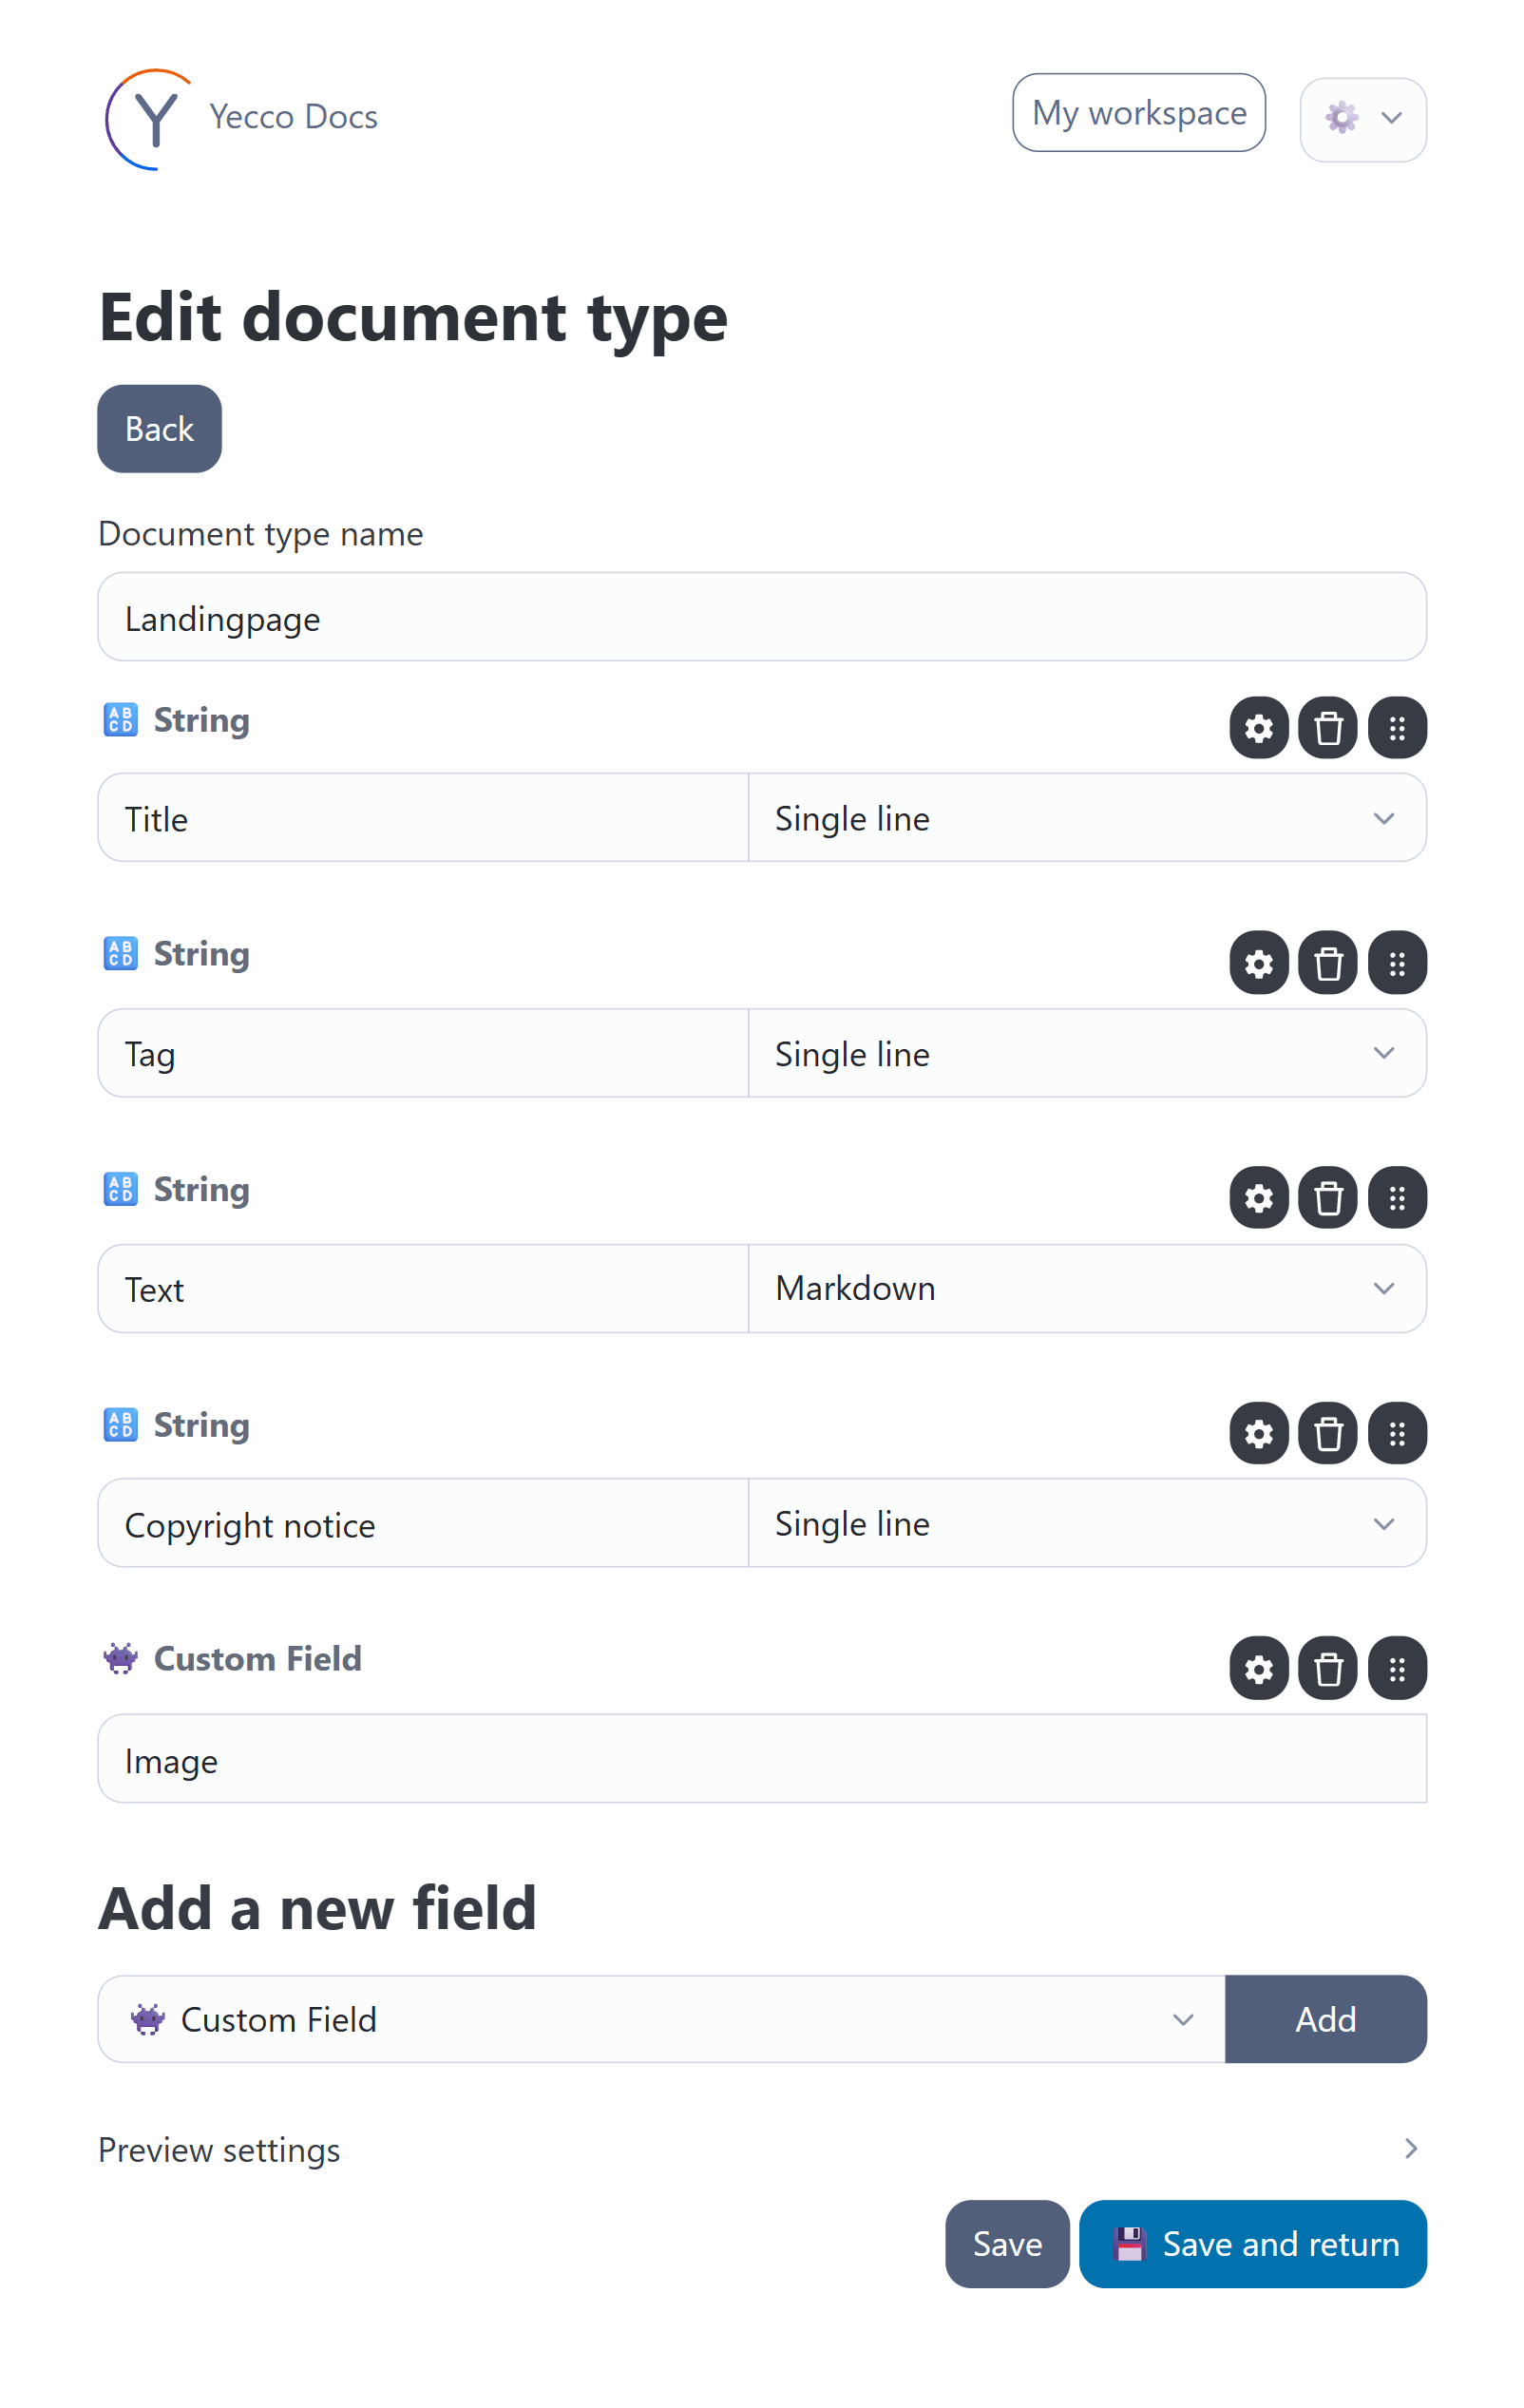
Now in your document, you can select an image. Head back to your document, by pressing the top right cogwheel (⚙️), then selecting Documents and opening your document. Press the Select button next to Image and upload an image from your PC. We've used this lovely image from Photo by TOMOKO UJI on Unsplash.
Your document will end up like this: 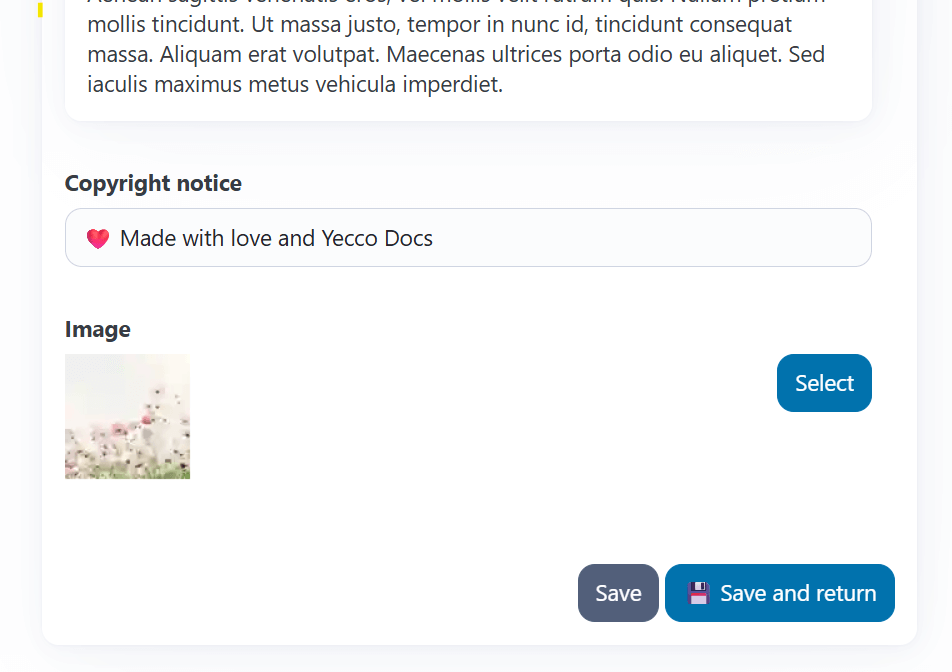
10. Render our uploaded image
Now we can render our image in the template src/views/index.njk. Update the header section like this:
<section>
    <header>
        <div class="image">
            { % set image = document.content.image %}
            <img width="1280" height="720" src="" alt="background image"/>
        </div>
        <div class="overlay"></div>
        <div class="content">
            <h1></h1>
            <h2></h2>
        </div>
    </header>
</section>
And just like that we've completed the tutorial and created this lovely landingpage, that's fully editable in Yecco Docs! 